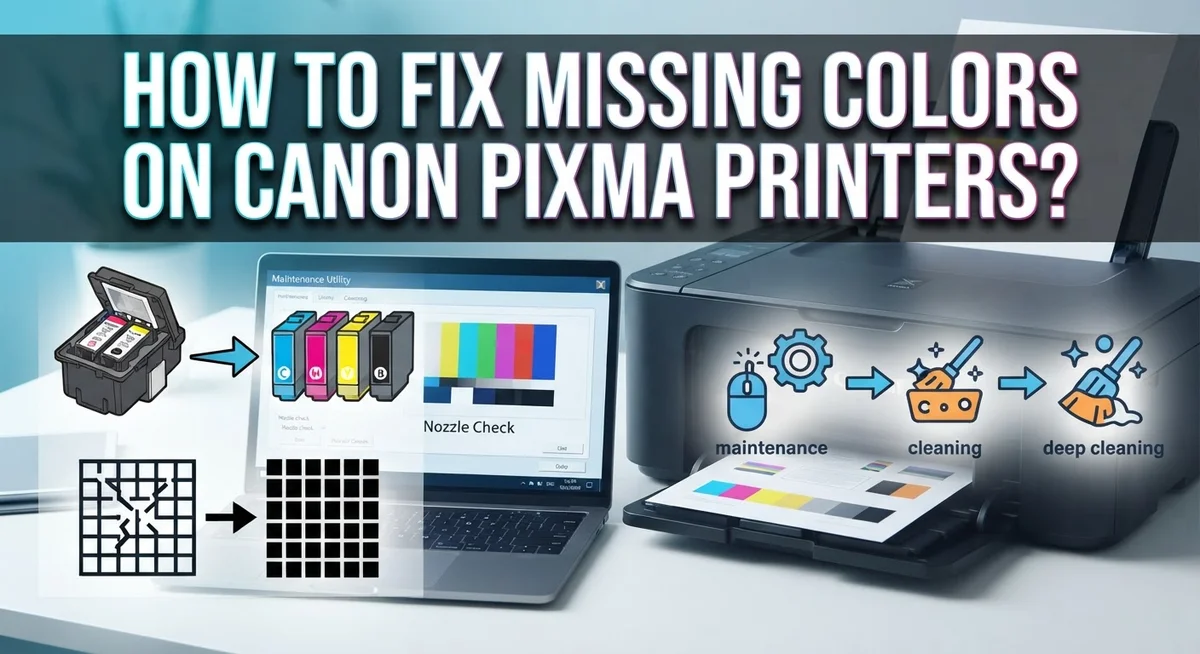
How to Fix Missing Colors on Canon Pixma Printers?
Do your printed pages look dull or missing certain colors? You are not alone. Many Canon Pixma users face this issue at some point.
Missing colors can turn a great photo print into a washed out mess. This problem often happens without warning. One day your prints look perfect, and the next day a color simply disappears.
The good news is that this issue is fixable. In most cases, a clogged printhead is the main culprit. Sometimes dirty cartridge contacts or wrong printer settings cause the same problem.
This guide will walk you through simple steps to bring back your missing colors. You will learn how to clean the printhead properly and how to check cartridge contacts for buildup.
In a Nutshell
- Clogged printheads cause most color problems. Soak the printhead in warm water for 10 to 15 minutes to clear this up.
- Dry the printhead completely before you put it back. Skipping this step is a common mistake that leads to more issues.
- Dirty cartridge contacts can also block colors. Clean the electrical contacts on both the cartridge and the carriage unit.
- Check your printer settings. Make sure “Color” mode is selected instead of “Grayscale” mode.
- Run a deep cleaning cycle if the problem continues. You can try this up to three times, but wait between each attempt.
- Look at the nozzle check pattern to see which color is missing. This helps you know exactly what to fix.
- If cleaning does not work, you may need to replace the cartridge. This is often the final fix for lasting color problems.
Common Causes of Missing Colors on Canon Pixma Printers
Your Canon Pixma printer uses four main color cartridges: black, cyan, magenta, and yellow. When one or more colors disappear from your prints, several specific issues are usually at fault.
Printhead clogs are the most common culprit. Ink sits inside the printhead for weeks or months without printing. When this happens, the ink dries and blocks the tiny nozzles that spray color onto paper. You will notice missing colors in your test prints or notice streaks and gaps.
Cartridge contact problems rank second in frequency. Each cartridge has electrical contacts that connect to your printer. Dust, dried ink, or debris on these contacts prevents the printer from recognizing the cartridge or reading its color data. Your printer then skips that color entirely.
Incorrect printer settings cause more issues than many people realize. If you accidentally select “Grayscale” mode instead of “Color” mode, your printer will print in black and white only. This looks like missing colors but is actually a software setting problem.
Washed out or faded colors differ from completely missing colors. This happens when your printer settings are optimized for regular paper instead of photo paper. The ink coverage decreases, making colors appear pale and weak.
Cartridge issues also play a role. Empty cartridges, expired cartridges, or cartridges with low ink levels can produce weak or missing colors. Some cartridges have protective seals that weren’t removed during installation, blocking ink flow completely.
Understanding these causes helps you troubleshoot faster. Each problem has a different fix, so identifying the exact cause saves you time and frustration.
How to Identify Which Color Is Missing Using a Nozzle Check
A nozzle check is your best tool to spot which color cartridge is failing. This test prints a pattern that shows you exactly which colors are working and which ones are blocked.
Start by opening your printer’s settings menu. Look for the “Maintenance” or “Tools” section. You will find a “Nozzle Check” option there. Click it and let your printer run the test. The printer will eject a page with colored lines and patterns.
Once you have the nozzle check pattern, examine it closely. Each color should print as solid, continuous lines. Black ink appears as one set of lines. Cyan, magenta, and yellow each show their own patterns. If you see gaps, streaks, or missing sections in any color’s pattern, that color is clogged or blocked.
Look at the pattern carefully. A completely missing color will show blank space where those lines should be. Faint or broken lines mean the nozzle is partially clogged. This helps you understand how severe the problem is.
Write down which colors are affected. This information guides your next steps. If only one color is missing, the issue is likely that specific cartridge or its nozzle. If multiple colors are missing, a printhead clog is more probable.
Keep the nozzle check pattern for your records. You can run another test after cleaning to compare results. This shows whether your cleaning efforts actually worked.
The nozzle check takes just a few minutes and uses very little ink. It gives you clear, visual proof of the problem before you spend time on fixes. This simple step saves you from guessing and wasting effort on the wrong solution.
Step-by-Step Guide to Cleaning the Printhead
Cleaning your printhead is the most effective way to restore missing colors. This process removes dried ink and debris that block color flow. Follow these steps carefully.
First, turn off your printer completely. Wait at least 30 seconds before proceeding. This ensures the printhead is in a safe position.
Locate the printhead inside your printer. Check your user manual if you are unsure where it sits. Open the access panel gently. Some models require you to move the carriage to the center first.
Remove the printhead carefully. Avoid touching the copper electrical contacts or the nozzle tips. These parts are delicate and sensitive.
Prepare a cup of warm water. The water should feel warm to your touch, not hot. Soak the printhead in this water for 10 to 15 minutes. This dissolves dried ink buildup inside the channels.
After soaking, gently wipe the bottom nozzle area with a lint free cloth. Do not scrub hard or use paper towels. These can damage the nozzles.
Let the printhead air dry completely. This step is critical. Moisture inside the printhead causes problems when you reinstall it. Wait at least 2 to 3 hours for thorough drying. You can place it on a clean, dry surface.
Once dry, reinstall the printhead into your printer. Align it properly with the carriage slot. Push it down until you hear or feel it click into place.
Close the access panel and turn your printer back on. Run a nozzle check pattern to verify the cleaning worked. If colors still appear missing, repeat the process or move to the next troubleshooting step.
How to Clean Cartridge Contacts for Better Connectivity
Your cartridge contacts are small metal strips on both the cartridge itself and inside your printer’s carriage unit. These contacts transfer electrical signals that tell your printer which colors to use. When dust, ink residue, or debris builds up on these contacts, your printer cannot communicate properly with the cartridges. This causes colors to disappear or print incorrectly.
Start by turning off your printer completely. Open the access door and locate the cartridge carriage. Gently remove each cartridge one at a time. Look at the bottom of each cartridge where the metal contacts are located. You will see small gold or copper colored strips.
Use a soft, lint free cloth slightly dampened with distilled water. Gently wipe the metal contacts on the cartridge. Do not scrub hard or use excessive moisture. The goal is to remove dirt and dried ink without damaging the delicate strips.
Next, clean the contact points inside your printer’s carriage unit. These are located where the cartridges sit. Use the same damp cloth to carefully wipe these metal strips inside the printer.
Reinsert each cartridge firmly until you hear a click. This ensures good electrical contact. Turn your printer back on and run a nozzle check to see if colors have returned.
If one color still does not print after cleaning, repeat the process for that specific cartridge. Sometimes stubborn residue requires two cleaning attempts. Wait at least 10 minutes between attempts to allow everything to dry properly. Avoid using alcohol or harsh chemicals, as these can damage the contacts permanently.
Checking and Adjusting Printer Color Settings
Your printer’s color settings control whether it produces full color or grayscale output. Many missing color problems start here before you blame hardware issues.
Open your printer’s settings menu on your computer. Look for the print dialog box that appears when you send a document to print. Find the option labeled “Color” or “Print Color.” Make sure you select “Color” mode, not “Grayscale” or “Black and White Only.” This simple step fixes more color problems than you might think.
Check your printer’s control panel as well. Some Canon Pixma models have a settings button directly on the machine. Navigate to the color mode option and confirm it’s set to print in color. Different models have slightly different menu layouts, so consult your printer’s manual if you’re unsure where to find this.
Verify your document itself contains color. If you’re printing from a black and white PDF or image file, your printer will only produce black output. Open your original file and check that colors are actually present before printing.
For photo paper or special media, adjust the media type setting in your printer preferences. Select “Photo Paper” or “Glossy Paper” instead of “Plain Paper.” This tells your printer to use the correct color intensity and ink saturation for better results.
After adjusting these settings, print a test page with color content. If colors still don’t appear, the issue likely involves your printhead or cartridges rather than software settings. Move forward with cleaning steps only after confirming your settings are correct. This saves time and prevents unnecessary troubleshooting.
Running Deep Cleaning Cycles the Right Way
A deep cleaning cycle is more powerful than a standard nozzle check. It forces ink through your printer’s system to clear stubborn clogs. Use this method when basic cleaning doesn’t restore your missing colors.
Access the deep cleaning option through your printer’s menu. Most Canon Pixma models have this feature in the maintenance section. Press the menu button on your printer’s control panel. Navigate to “Maintenance” or “Tools.” Select “Deep Cleaning” from the list. Your printer will run an automated cycle that takes several minutes.
Wait at least 30 minutes before running another deep cleaning cycle. Your printer needs time to process the ink flow and dry internal components. Running cycles back to back can waste ink and damage your printhead. After the first cycle completes, print a nozzle check pattern to see your results.
If colors still don’t appear, run a second deep cleaning cycle. Most issues resolve within two attempts. A third cycle is possible but rarely necessary. Between each attempt, always allow your printer to rest and cool down.
Monitor your ink levels during this process. Deep cleaning uses more ink than regular printing. If your cartridges are nearly empty, replace them first. Low ink can prevent proper cleaning results.
After completing deep cleaning cycles, print a full color test page. This shows which colors have returned. If specific colors remain missing after three deep cleaning attempts, your cartridge may need replacement. The printhead itself might also have permanent damage requiring professional service. Document which colors failed so you can provide this information if you need further assistance.
Mistakes to Avoid When Fixing Color Issues
Many people rush through color fixes and make mistakes that make the problem worse. Understanding what NOT to do helps you succeed faster.
Skipping the drying step is a major error. After soaking your printhead in warm water, you must let it dry completely. Moisture left inside causes electrical shorts and permanent damage. Give it at least 2 to 3 hours of air drying time before reinstalling.
Another common mistake is cleaning cartridge contacts too quickly or not thoroughly enough. The electrical contacts need real attention. Use a lint free cloth with distilled water and wipe each contact multiple times. Rushing this step means poor connection, and your colors won’t print properly.
Don’t run deep cleaning cycles back to back. Many people think consecutive cleanings solve the problem faster. This actually wastes ink and can damage your printhead. Always wait at least 30 minutes between each cycle. Your printer needs time to rest between deep cleaning attempts.
Ignoring your printer settings causes unnecessary frustration. Before troubleshooting hardware, verify your color mode is set to “Color” and not “Grayscale.” Check both your computer settings and your printer’s control panel. This simple step solves many color problems without any physical work.
Don’t assume all missing colors have the same cause. A missing cyan color requires different attention than missing magenta. Run a nozzle check first to see exactly which color isn’t printing. This tells you whether to focus on one cartridge or the entire printhead.
Finally, avoid replacing cartridges too early. Many people buy new cartridges when cleaning would have worked. Give your cleaning efforts time to work before spending money on replacements.
When to Replace Cartridges Instead of Cleaning
Your Canon Pixma printer may need cartridge replacement when cleaning methods stop working. Understanding when to replace rather than clean saves time and frustration.
Replace cartridges if cleaning doesn’t fix the problem after two or three attempts. Printhead cleaning and deep cycles work well for temporary clogs. However, if your nozzle check still shows missing colors after these steps, your cartridge itself may be damaged.
Look for these signs that replacement is necessary. If ink appears dried out inside the cartridge, cleaning won’t restore it. When electrical contacts show permanent discoloration or corrosion, the cartridge cannot communicate properly with your printer. Cartridges that have been stored for very long periods often stop working even after cleaning attempts.
Check your cartridge’s expiration date first. Expired cartridges lose their ability to hold ink properly. They may look full but produce no color output.
Physical damage to a cartridge means replacement is your only option. Cracks, leaks, or bent components cannot be repaired through cleaning. If you notice ink leaking inside your printer, remove that cartridge immediately and replace it.
Monitor how many cleaning cycles you’ve completed. Running more than three deep cleaning cycles wastes ink and indicates a deeper problem exists. At this point, replacement becomes more cost effective than continued cleaning.
New cartridges also solve issues caused by old ink that has thickened or separated. This happens naturally over time and cannot be reversed by cleaning alone.
Keep your receipt when you purchase replacement cartridges. This helps you track which cartridges you’ve used and when problems started occurring. This information helps you identify patterns with your printer’s performance.
Final Thoughts
Missing colors on your Canon Pixma printer feel frustrating. But most fixes are simple and quick.
Printhead clogs cause most color problems. A warm water soak often solves this issue completely.
Clean cartridge contacts whenever cleaning cycles don’t work alone. Dirty contacts block communication between your printer and cartridges.
Always check your printer settings first. Many people skip this step and waste time on unnecessary repairs.
Grayscale mode often gets selected by accident. Switching back to color mode fixes the problem instantly for some users.
Patience matters throughout this process. Rushing through steps creates new problems instead of solving old ones.
Give your printhead time to dry fully. Moisture left behind ruins your cleaning efforts completely.
Space out your deep cleaning cycles properly. Your printer needs rest between attempts to work effectively.
Cartridge replacement becomes necessary sometimes. Don’t feel bad about buying new cartridges when cleaning stops working.
Old ink thickens and separates over time. Fresh cartridges often solve stubborn color issues that cleaning cannot fix.
Test your printer after every single step. This helps you know exactly what worked and what didn’t.
Nozzle checks reveal helpful information before you start. They show which colors are missing and guide your next move.
Small maintenance habits prevent future problems. Regular use keeps ink flowing and clogs away.
Your Canon Pixma printer can work perfectly again. Follow these steps calmly and check your results along the way.
Most color issues get resolved without professional help. A little patience and the right approach make all the difference.
Frequently Asked Questions
Why is one color missing from my Canon Pixma printer?
A clogged printhead is the most common reason. Your printhead can get blocked when ink dries inside it or when cartridge contacts become dirty. Check your nozzle pattern first to see which specific color isn’t printing. This tells you exactly what needs attention.
Incorrect printer settings also cause this issue. You may have accidentally selected Grayscale mode instead of Color mode. Always verify your settings before you assume there’s a hardware problem.
How do I clean the printhead on my Canon Pixma?
Remove your printhead carefully from the printer. Soak it in warm water for 10 to 15 minutes. The warm water helps dissolve dried ink inside the nozzles.
After soaking, let it dry completely before reinstalling it. This drying step is critical. Skipping it can damage your printer or make the problem worse.
What should I do if cleaning doesn’t work?
Try cleaning your cartridge contacts next. Remove each cartridge and wipe the electrical contacts gently with a clean cloth. Also clean the contacts on the carriage unit inside your printer.
Reinsert the cartridges and run a nozzle check. If colors still don’t appear, you can run up to three deep cleaning cycles. Wait between each cycle so your printer has time to process.
When should I replace my cartridges instead?
Replace cartridges if two or three cleaning attempts don’t fix the problem. Check the expiration date on your cartridges first. Expired ink loses its ability to flow properly.
Physical damage to a cartridge means replacement is your only option. Old ink also thickens and separates over time, which causes color issues that cleaning won’t solve.

I’m the voice behind Device Dossier. As a printing technology enthusiast, I spend my time testing printers, comparing specs, and writing honest reviews to help you find the perfect printing solution. When I’m not geeking out over print quality and page yields, you’ll find me exploring the latest in tech.