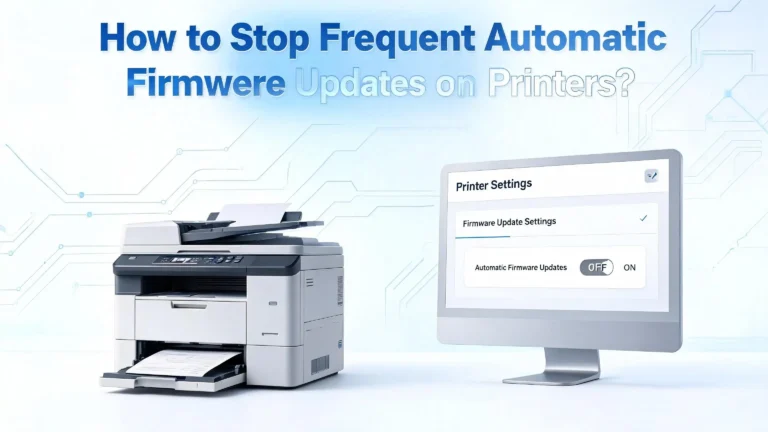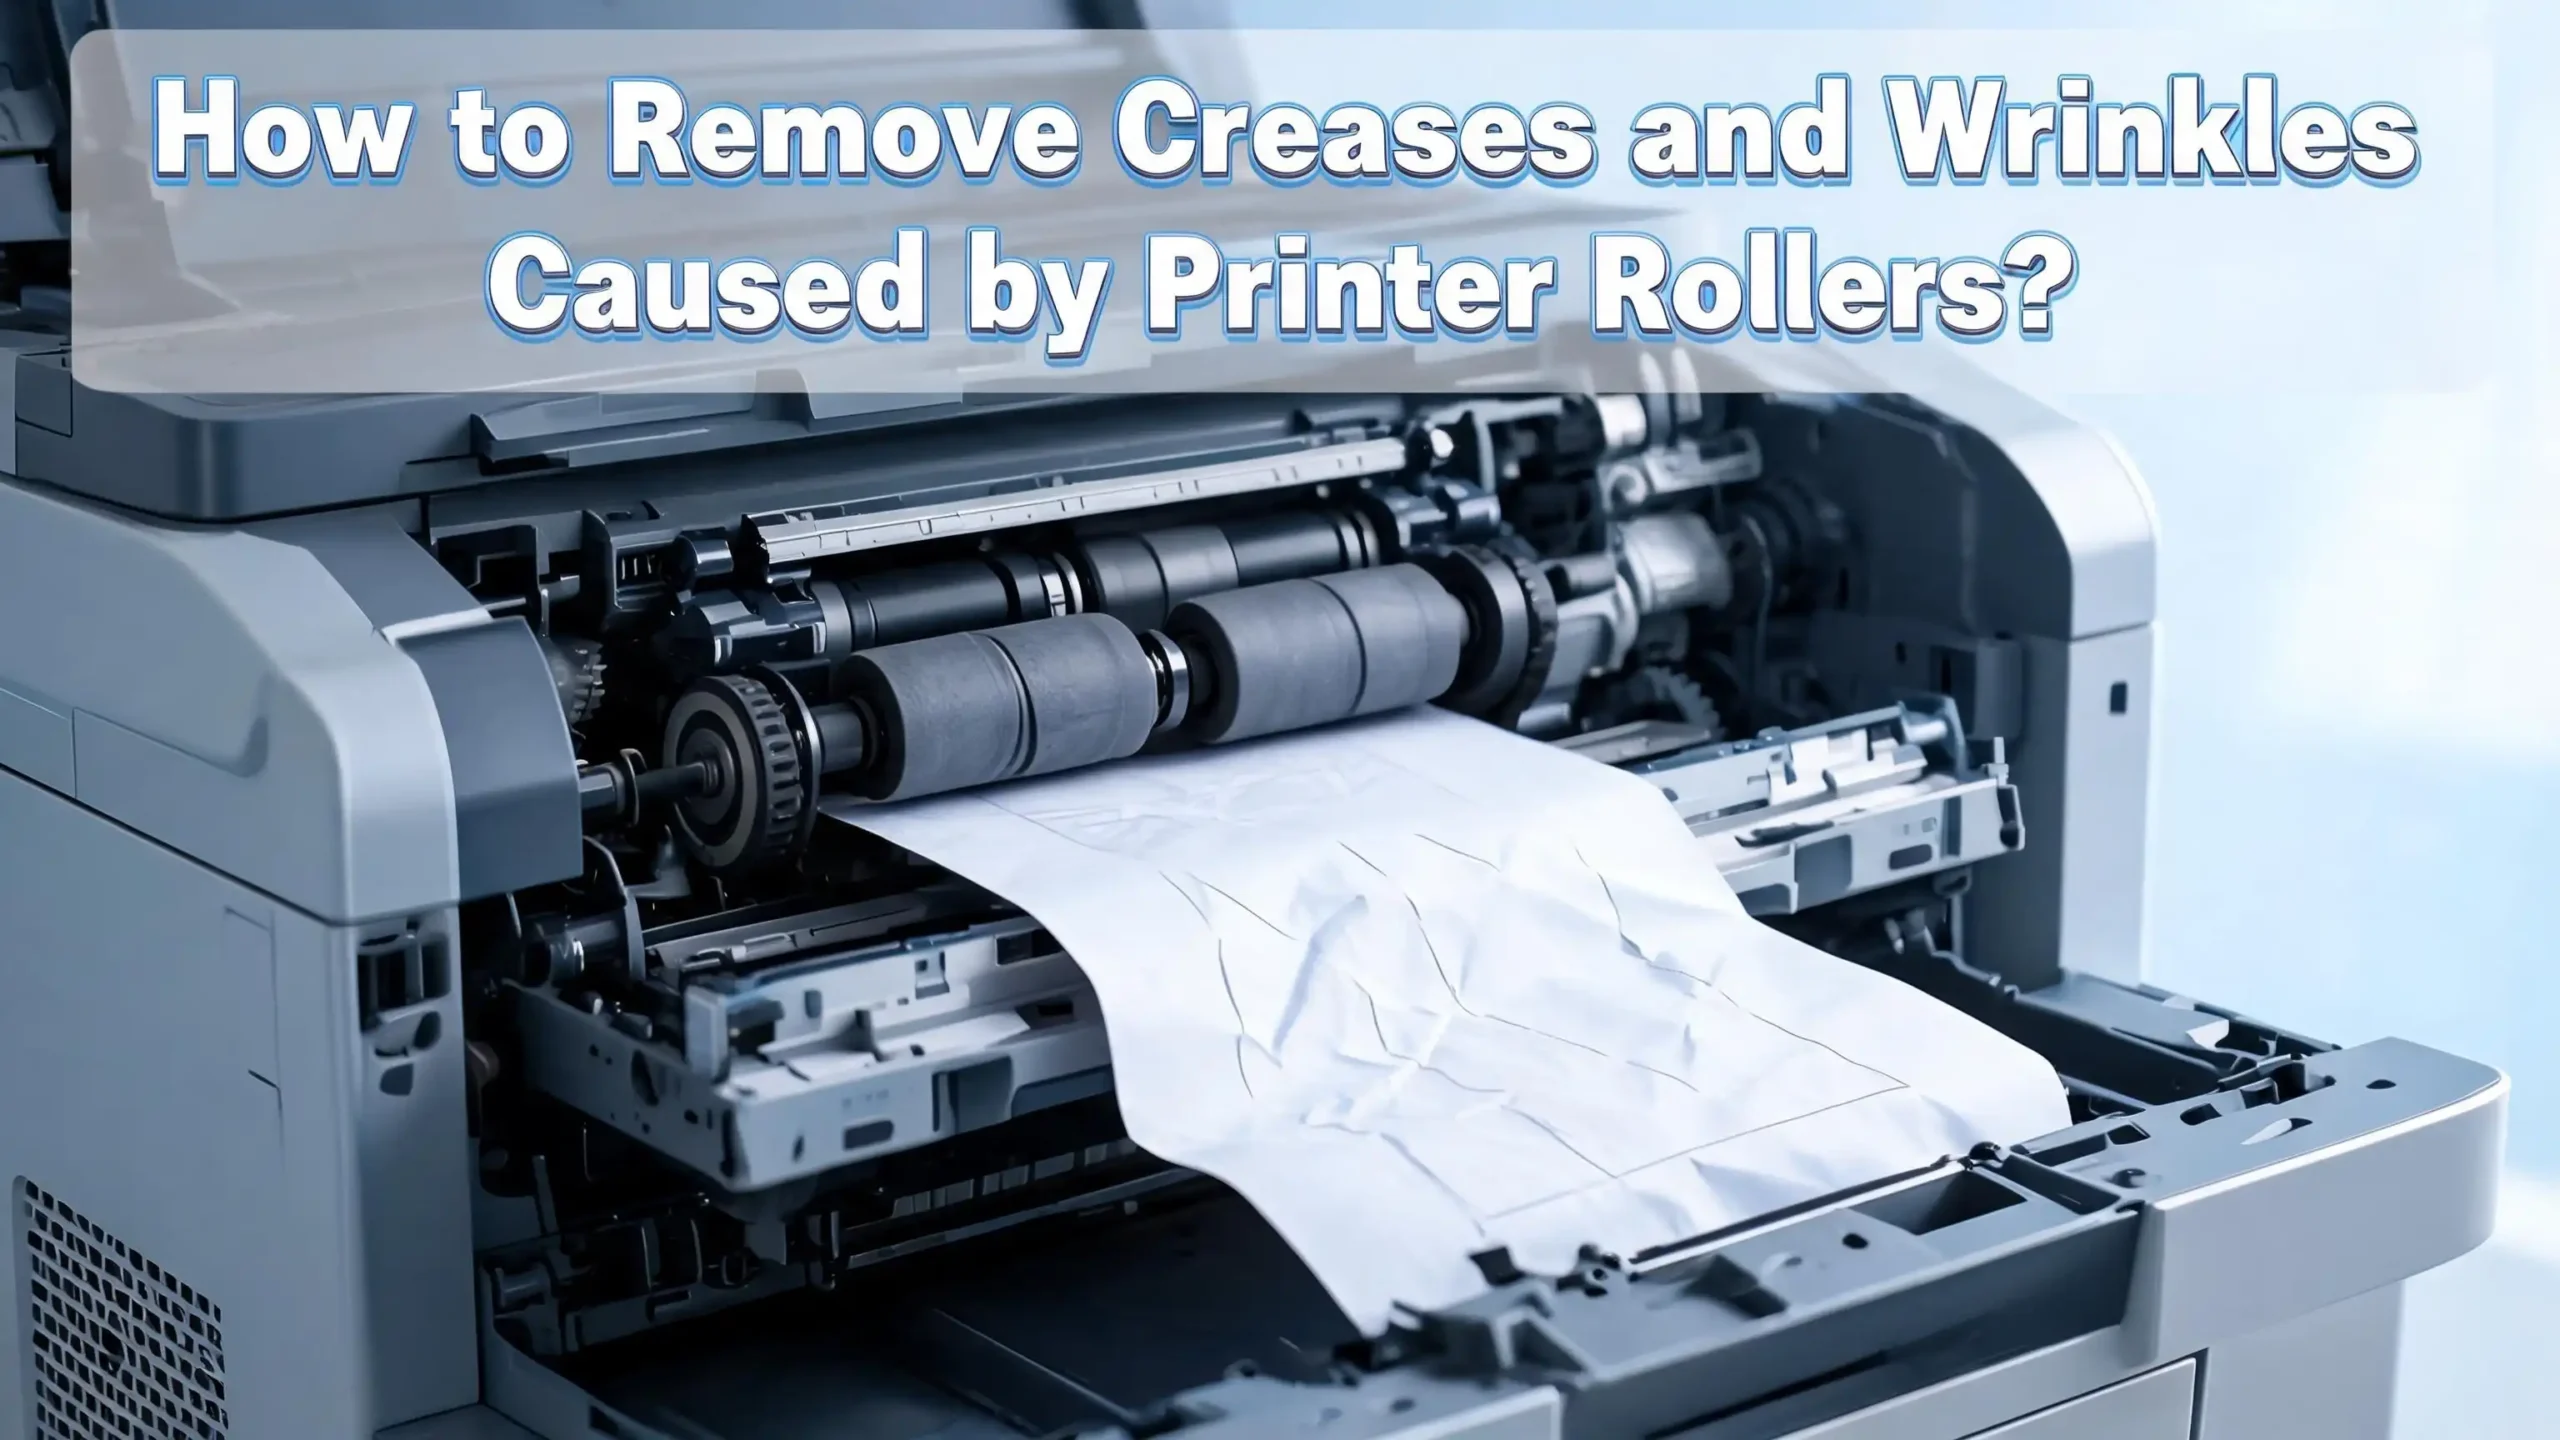
How to Remove Creases and Wrinkles Caused by Printer Rollers?
You just hit “Print” on an important document. The printer hums, the paper feeds through, and out comes… a creased, wrinkled mess. Sound familiar? Creases and wrinkles caused by printer rollers are one of the most common printing frustrations people face at home and in the office. T
The good news is that you do not need to be a technician to solve this. Whether your pages come out with sharp fold lines, soft ripples, or full crumples, there is a clear reason behind each one.
Worn rollers, moisture in the paper, a failing fuser unit, or even the wrong paper type can all trigger these issues.
This guide walks you through every cause, every fix, and every prevention tip so you can get back to clean, smooth prints fast. Let us dig in and get your printer running right again.
Key Takeaways
- Printer roller creases are fixable at home in most cases. You do not always need a repair technician. Simple checks on your rollers, paper, and tray alignment can solve the majority of wrinkling problems without spending money on service calls.
- Dirty or worn feed rollers are the number one cause. Over time, the rubber on printer rollers loses its grip and picks up dust and debris. This causes paper to feed unevenly, which produces creases and wrinkles in your printed pages.
- Paper quality and storage matter more than most people think. Damp, curled, or low quality paper is a leading trigger for wrinkled output. Always use fresh, dry paper from a sealed ream and store it in a cool, dry location away from humidity.
- A damaged fuser unit can create deep, sharp creases. In laser printers, the fuser applies heat to bond toner to the page. If the fuser rollers are worn or cracked, they will leave marks, wrinkles, or even burn lines on every sheet.
- Regular maintenance prevents repeat problems. Cleaning your rollers once a month, checking the paper path for debris, and replacing worn parts on schedule will keep creases and wrinkles from coming back.
- You can also rescue already wrinkled printouts. Lightly misting paper with distilled water and pressing it under heavy books, or gently ironing it under a towel, can smooth out creases on documents you need to save.
Why Do Printer Rollers Cause Creases and Wrinkles
Printer rollers are the rubber or silicone cylinders inside your machine that grab the paper and pull it through the print path. Every sheet you print passes over multiple rollers. These include pickup rollers that grab paper from the tray, feed rollers that guide it through the machine, and exit rollers that push the finished page out.
When any of these rollers become dirty, worn, or damaged, they lose their ability to move paper smoothly. A roller with uneven grip will pull one side of the paper faster than the other. This creates tension across the sheet, and that tension produces visible creases or wrinkles.
Dust, paper fibers, and ink residue build up on rollers over time. This coating reduces traction and causes slipping. Worn rollers develop smooth, shiny surfaces where the rubber has degraded. Cracked rollers create uneven pressure points that leave marks on the paper.
In laser printers, the fuser unit adds another layer of risk. The fuser uses heat and pressure to bond toner to the page. If the fuser rollers are damaged or warped, they apply uneven heat and pressure, which warps the paper as it passes through. This is why laser printed pages sometimes come out with deep, sharp creases rather than soft wrinkles.
Understanding the role each roller plays helps you diagnose the exact source of the problem. If wrinkles appear before the ink or toner is applied, the issue is with the feed rollers. If wrinkles appear only on finished pages, the fuser is likely the cause.
How to Identify the Type of Crease or Wrinkle
Not all printer wrinkles look the same, and the type of damage on your page tells you a lot about what is going wrong inside the machine. Taking a close look at the wrinkled output before you start fixing things will save you time and effort.
Soft ripples or waves across the page usually point to a paper moisture problem. Paper that has absorbed humidity from the air tends to warp. When warped paper feeds through tight rollers, it bunches up and creates wavy lines. This type of wrinkling is common in humid climates or offices without climate control.
Sharp, defined fold lines that run parallel to the direction of paper travel usually indicate a problem with the feed rollers or paper guides. Something is catching the paper or applying uneven pressure as it moves through the machine. Check for debris in the paper path or misaligned tray guides if you see this pattern.
Deep creases with toner smudging are a strong sign of fuser damage. The fuser rollers are applying too much pressure in one spot or have a physical defect. You may also notice a burning smell or unusually hot output if the fuser is failing.
Small dotted indentations, sometimes called “pizza wheel marks,” are common in inkjet printers. These come from the star wheels or pinch rollers that hold wet paper flat as it moves through the printer. They are especially visible on glossy or coated paper where the surface is soft enough to hold the impression.
Knowing which type of wrinkle you have points you directly to the right fix. This saves you from replacing parts that do not need replacing.
How to Clean Dirty Printer Rollers
Dirty rollers are the most common and easiest to fix cause of printer creasing. A buildup of paper dust, ink residue, and environmental debris on the roller surface reduces traction and causes the paper to slip, skew, and wrinkle. Cleaning takes about ten minutes and requires only basic supplies.
First, turn off your printer and unplug it from the power source. Safety comes first. If you have a laser printer, let it cool down for at least 15 minutes because the fuser area gets extremely hot during use.
Open the paper tray and locate the rollers. Most printers have visible rollers inside the tray compartment or behind an access panel at the back. Your printer manual will show you exactly where they are. Look for rubber cylinders that appear shiny, dusty, or coated with residue.
Dampen a lint free cloth with isopropyl alcohol or distilled water. Do not use tap water because minerals in tap water can leave a residue. Do not soak the cloth. It should be damp, not dripping. Gently wipe each roller while rotating it by hand to clean the full surface. Apply light, even pressure.
For stubborn buildup, use a cotton swab dipped in isopropyl alcohol to clean hard to reach spots. Some users also find that a slightly damp paper towel fed through the printer manually can pick up surface debris effectively.
After cleaning, allow the rollers to air dry completely before closing the tray and plugging the printer back in. Run a test print with a blank page to confirm smooth paper feeding. If the paper feeds cleanly without wrinkles, the problem was dirt buildup. If wrinkles continue, the rollers may need replacement.
How to Replace Worn Out Printer Rollers
When cleaning does not solve the problem, the rollers themselves may be too worn to function properly. Rubber degrades over time. It loses elasticity, develops cracks, and becomes smooth and shiny. A roller in this condition cannot grip paper consistently, and replacing it is the only solution.
Check your printer model number and search for replacement roller kits from your printer manufacturer. Most major brands sell roller replacement kits that include the pickup roller, separation pad, and feed rollers. These kits are designed for user installation and come with instructions.
To replace rollers, power off and unplug your printer. Open the access panel or remove the paper tray to expose the roller assembly. Most rollers snap out of a bracket or release with a small tab. Note the position and orientation of the old roller before removing it so you can install the new one correctly.
Slide the new roller into place and make sure it clicks or locks securely. Reassemble the tray and access panel. Plug in the printer and run several test prints to confirm the paper feeds smoothly without creases.
Roller replacement is generally recommended every 50,000 to 100,000 pages, depending on your printer model and usage. High volume environments like offices and schools should check rollers more frequently. If you print daily, inspect your rollers every three to six months for signs of wear.
Replacing rollers costs far less than replacing the entire printer. A set of rollers typically costs a fraction of what a technician visit would cost, and the swap takes about 15 to 20 minutes for most models.
How to Check and Fix the Fuser Unit
The fuser unit is a critical component in laser printers. It uses heat and pressure to melt toner onto the paper surface. When the fuser malfunctions, it can cause some of the most severe creasing and wrinkling problems. Deep folds, burn marks, and toner smearing are all signs of fuser trouble.
Start your inspection by printing a test page. If the wrinkles or creases appear only after the toner has been applied, the fuser is likely the source. Wrinkles that appear on blank pages suggest a feed roller issue instead.
Power off the printer and let it cool for at least 20 minutes. The fuser area reaches very high temperatures during printing. Open the rear access panel or the panel specified in your printer manual. Locate the two fuser rollers. One is usually an orange or gray heat roller, and the other is a black pressure roller.
Inspect both rollers carefully. Look for scratches, gouges, uneven coating, or debris stuck between the rollers. If you see torn paper fragments caught in the fuser area, carefully remove them. Even a small piece of stuck paper can cause wrinkles on every subsequent page.
If the rollers show physical damage like cracks, peeling coating, or warping, the fuser assembly needs replacement. Fuser units are available from your printer manufacturer and are designed as replaceable components. Many are sold as part of a maintenance kit that also includes new rollers and a transfer belt.
Some printers allow you to adjust the fuser temperature through the settings menu. If your paper is too thin for the current heat setting, lowering the fuser temperature can reduce curling and wrinkling. Check your printer settings to match the paper weight you are using.
How Paper Quality Affects Creasing and Wrinkling
The paper you use plays a huge role in whether your printer produces clean pages or wrinkled ones. Even a perfectly maintained printer will wrinkle low quality or improperly stored paper. Understanding paper requirements prevents many common printing problems.
Paper weight matters. Most home and office printers are designed for 20 lb to 24 lb bond paper (75 to 90 g/m²). Paper that is too thin feeds unevenly and is more likely to crumple inside the machine. Paper that is too thick can jam or stress the rollers. Always check your printer manual for the supported paper weight range.
Moisture is the biggest enemy of clean prints. Paper absorbs humidity from the air, and even a small increase in moisture content causes the fibers to swell unevenly. When damp paper hits the hot fuser rollers in a laser printer, the moisture evaporates rapidly and causes the sheet to warp, curl, or wrinkle.
Store your paper in a cool, dry location and keep it in its sealed packaging until you are ready to use it. Do not leave paper sitting in the tray for weeks, especially in humid environments. If paper has been exposed to moisture, replace it with a fresh ream from an unopened package.
Recycled paper and bargain brands are more likely to cause feeding problems. These papers often have inconsistent thickness, rough edges, or loose fibers that shed dust onto rollers. If you experience frequent wrinkles, switching to a higher quality paper that meets your printer manufacturer’s recommendations can make a noticeable difference.
Specialty media like glossy paper, labels, and cardstock have specific tray and setting requirements. Loading glossy paper in the wrong tray or printing it with the wrong media type selected can cause severe wrinkling and roller marks.
How to Load Paper Correctly to Prevent Wrinkles
Incorrect paper loading is a surprisingly common cause of printer creases. The way you place paper in the tray affects how the rollers grab each sheet. Even a minor misalignment can send the paper through at an angle, creating folds and wrinkles.
Always fan the paper before loading it. Take the stack of paper and flex it back and forth a few times to separate any sheets that may be stuck together. Sheets that stick together cause double feeds, jams, and wrinkles. Fanning takes five seconds and prevents many problems.
Adjust the paper guides to fit snugly against the edges of the stack. The side guides and rear guide should touch the paper on all sides without squeezing it. Guides that are too loose allow the paper to shift during feeding. Guides that are too tight pinch the paper and create drag marks and creases.
Do not overfill or underfill the tray. Every paper tray has a maximum fill line marked on the inside. Loading paper above this line puts too much pressure on the pickup roller and causes sheets to feed crookedly. Loading too few sheets can cause the roller to miss the paper or grab it at an awkward angle.
Make sure every sheet in the stack is flat, clean, and undamaged. Remove any pages with bent corners, tears, or existing creases. A single damaged sheet in the stack can cause a chain reaction that jams or wrinkles multiple pages behind it.
If your printer has multiple tray options, use the correct tray for your paper type. Many printers require thick paper, envelopes, and specialty media to be loaded in a specific multipurpose tray rather than the main cassette.
How to Fix Inkjet Printer Roller Marks on Glossy Paper
Inkjet printers use small star shaped wheels, often called “pizza wheels” or pinch rollers, to hold paper flat as it moves through the print zone. These tiny wheels press against the paper surface to keep it from buckling while the ink is still wet. On glossy or coated paper, these wheels can leave visible dotted lines or indentations that ruin the print.
This problem is especially frustrating for photographers and artists who print on premium glossy media. The marks are most visible on dark, heavily inked areas where the paper surface is soft and the ink is thick.
The first fix is to check your printer driver settings. Many inkjet printers have a setting for “thick paper” or “platen gap adjustment” that increases the distance between the paper and the rollers. Selecting a thicker media type in your driver settings tells the printer to reduce the pressure applied by the star wheels.
Some printers also offer a “dry time” or “drying interval” setting that pauses briefly between passes to let the ink dry before the rollers touch the surface. Increasing this setting gives the ink more time to set, which reduces the depth of roller impressions.
For a physical fix, you can clean the star wheels themselves. Use a cotton swab dipped in isopropyl alcohol to gently wipe each star wheel. Ink residue on these wheels makes the indentations worse because the buildup increases friction.
If marks persist, try printing on a slightly heavier glossy paper. Thicker media resists indentation better than lightweight glossy sheets. You can also try printing at a lower quality setting that uses less ink, which reduces how wet the surface is when the rollers pass over it.
How to Clear Debris from the Paper Path
Small pieces of torn paper, label adhesive, dust, and other debris inside the paper path create friction that causes sheets to wrinkle, jam, or crease as they move through the printer. Regular cleaning of the paper path keeps everything running smoothly.
Power off the printer and unplug it before you start. Open the front, back, and side access panels. Remove the paper tray. Look inside each opening for visible bits of paper, dust bunnies, or sticky residue. Use a flashlight to check corners and narrow sections that are hard to see.
Carefully pull out any torn paper fragments with your fingers or plastic tweezers. Never use metal tools inside your printer. Metal can scratch roller surfaces, damage sensors, or create electrical shorts. If a piece of paper is stuck between the fuser rollers, wait until the printer has fully cooled before attempting removal.
Use compressed air in short bursts to blow loose dust out of the paper path. Hold the can upright and direct the air away from delicate sensors and circuit boards. Compressed air is effective for reaching areas your hands cannot access.
For sticky residue from labels or adhesive paper, dampen a lint free cloth with isopropyl alcohol and gently wipe the affected surface. Label adhesive is one of the most common causes of persistent creasing because it grabs each subsequent sheet in the same spot.
After cleaning, reassemble the tray and panels. Run three to five blank pages through the printer to pick up any remaining loose particles. Check the output for clean, wrinkle free results. If debris problems happen often, consider using higher quality paper and avoiding label sheets that are prone to peeling inside the machine.
How to Flatten Already Wrinkled Printed Pages
Sometimes you need to save a document that already came out wrinkled. Maybe it is a printed certificate, a letter, or a report that you cannot easily reprint. There are several effective ways to flatten wrinkled paper and make it look presentable again.
The simplest method is pressing the paper under heavy books. Place the wrinkled page between two sheets of clean, dry blotting paper or plain white paper. Set a stack of heavy books on top. Leave it for 24 to 48 hours. The weight slowly flattens the fibers and reduces the visibility of creases. This method is safe for almost all paper types and printed inks.
For faster results, you can use a household clothes iron. Set the iron to its lowest heat setting with no steam. Place the wrinkled paper on a flat, heat safe surface. Cover it with a thin cotton towel or pillowcase to protect the printed surface from direct heat. Press the iron gently over the towel and move it steadily across the surface.
Check the paper after one minute. If creases remain, you can increase the heat slightly or lightly mist the back of the paper with distilled water before ironing again. The moisture softens the paper fibers and helps them relax into a flat position.
Be careful with laser printed pages. Toner is a plastic based material that can melt and stick to your iron or towel if the heat is too high. Start at the lowest setting and increase slowly. Inkjet prints are generally safer to iron because the ink absorbs into the paper fibers.
For valuable or irreplaceable documents, consider placing them in an archival quality plastic sleeve instead of attempting to flatten them. Professional archival services can also flatten and preserve important papers using specialized equipment.
How to Adjust Printer Settings to Reduce Creasing
Your printer software and control panel offer several settings that can reduce or eliminate creases and wrinkles. Many users overlook these options, but matching your printer settings to the paper you are using makes a significant difference in output quality.
Start by selecting the correct paper type in your print driver. Open your printer settings before printing and choose the media type that matches what is loaded in the tray. Selecting “plain paper” when you have loaded glossy stock, or “thick paper” when you have loaded standard sheets, causes the printer to apply the wrong amount of heat, pressure, and speed.
Paper weight and texture settings also affect how the rollers handle each sheet. Some printers, especially Lexmark and HP laser models, let you set the paper texture to smooth, normal, or rough. Setting the texture to “smooth” and the weight to “light” for standard office paper reduces the pressure the fuser applies, which can solve wrinkling on thinner stock.
If your laser printer offers a fuser temperature adjustment, experiment with lowering it one level. Excessive fuser heat causes paper to curl and wrinkle, especially in humid environments where the paper already contains extra moisture. Lowering the heat slightly can solve this without affecting toner adhesion.
For inkjet printers, increasing the dry time between passes reduces the chance of wet paper buckling under roller pressure. Look for this setting in the advanced print quality options of your driver software.
Print speed can also matter. Slower print speeds give the paper more time to move smoothly through each roller. If you are printing important documents and wrinkles are a concern, selecting a higher quality or slower print mode often produces cleaner results.
How to Set Up a Regular Printer Maintenance Schedule
Preventing creases and wrinkles is much easier than fixing them after they happen. A simple maintenance routine keeps your rollers clean, your paper fresh, and your printer running smoothly for years. The effort is minimal, and the results are significant.
Monthly, clean your printer rollers using the method described earlier in this guide. Wipe the pickup rollers, feed rollers, and any accessible star wheels with a lint free cloth dampened with isopropyl alcohol. This removes dust and residue before it builds up enough to cause feeding problems.
Every three months, inspect the paper path for debris. Open all access panels and check for torn paper, dust, or sticky residue. Use compressed air to clear out hard to reach areas. Replace any paper that has been sitting in the tray for more than a few weeks, especially during summer months when humidity is higher.
Every six months, inspect the rollers for physical wear. Look for shiny spots, cracks, or areas where the rubber has become hard and inflexible. If you print more than 500 pages per month, check more frequently. Replace rollers at the intervals recommended by your printer manufacturer.
Keep a log of when you perform maintenance and when you replace parts. This helps you spot patterns. If creasing starts happening three months after a roller replacement, you know the rollers in your environment wear faster than average and can adjust your schedule.
Store your paper properly at all times. Keep it sealed, flat, and in a climate controlled area. Do not store paper near windows, heaters, air conditioning vents, or in garages and basements where temperature and humidity fluctuate widely.
Finally, keep your printer on a stable, flat surface in a clean room. Dust in the air settles on rollers and inside paper paths. A cleaner environment means less frequent maintenance and fewer wrinkle problems overall.
When to Call a Professional for Printer Repairs
Most creasing and wrinkling problems can be solved with the steps in this guide. However, some situations require professional help. Knowing when to stop troubleshooting and call a technician saves you from accidentally damaging your printer further.
If creases persist after you have cleaned the rollers, replaced the paper, checked the fuser, and adjusted settings, the problem may be deeper inside the machine. Internal components like the transfer belt, registration assembly, or drive gears can wear out and cause paper handling issues that are not visible from the outside.
Grinding, clicking, or squealing noises during printing suggest a mechanical failure. These sounds often come from damaged gears, misaligned components, or a fuser motor that is failing. Continuing to print with these symptoms can worsen the damage and increase repair costs.
Burn marks or a strong burning smell indicate the fuser is overheating or a component is melting. Stop using the printer immediately and unplug it. This situation can be a safety hazard and should be addressed by a qualified technician.
If your printer is still under warranty, contact the manufacturer’s support line before attempting any part replacements yourself. Opening certain components may void the warranty. The manufacturer can guide you through approved troubleshooting steps or arrange a repair.
For out of warranty printers, search for an authorized service center for your printer brand. Provide the technician with details about the creasing pattern, when it started, and what troubleshooting steps you have already tried. This information helps them diagnose the problem faster and reduces your repair time and cost.
Frequently Asked Questions
Can humidity in my office cause printer paper to wrinkle?
Yes. Paper absorbs moisture from the air, and humid environments cause paper fibers to swell unevenly. When this damp paper passes through the printer rollers, it wrinkles or curls. Store paper in sealed packaging and keep it in a dry area. If you live in a humid climate, consider using a dehumidifier in the room where you print.
How often should I clean my printer rollers?
For most home users, cleaning rollers once a month is enough. If you print more than 500 pages per month or work in a dusty environment, clean them every two weeks. Use a lint free cloth dampened with isopropyl alcohol or distilled water. Regular cleaning prevents the dust and residue buildup that causes paper to feed unevenly and wrinkle.
Will reusing paper that has already been printed on cause wrinkles?
It often does. Paper that has passed through a laser printer has already been exposed to high heat, which changes the fiber structure. Reusing it can cause curling, jamming, and creasing. Inkjet printed paper may also have slightly warped areas from absorbed ink. Use fresh paper for important documents to avoid wrinkle problems.
Can I fix roller marks on glossy photo prints?
Minor roller marks on glossy prints are difficult to remove after printing. Prevention is the best approach. Use your printer’s thick paper or glossy media setting, increase the dry time between passes, and clean the star wheels regularly. Printing on heavier glossy stock also reduces the depth of roller indentations.
Do all printer brands have the same roller creasing problems?
Roller creasing can happen with any printer brand, including HP, Brother, Canon, Epson, and Lexmark. The root causes are the same across brands: dirty rollers, worn parts, wrong paper, and incorrect settings. The specific maintenance steps and replacement parts vary by model, so always check your printer’s user manual for brand specific instructions.
Is it safe to iron a laser printed document to remove wrinkles?
You can iron laser printed documents, but use caution. Toner is a plastic material that can melt at high temperatures. Always start at the lowest heat setting and place a thin cotton towel between the iron and the paper. Never use steam directly on a laser printed page. Increase heat gradually and check frequently to avoid melting the toner onto your towel or ironing surface.
I’m the voice behind Device Dossier. As a printing technology enthusiast, I spend my time testing printers, comparing specs, and writing honest reviews to help you find the perfect printing solution. When I’m not geeking out over print quality and page yields, you’ll find me exploring the latest in tech.